This information was published in Kasshysan's web site. And it's made by Seijisan.
Anyway, thank you so much for this information.
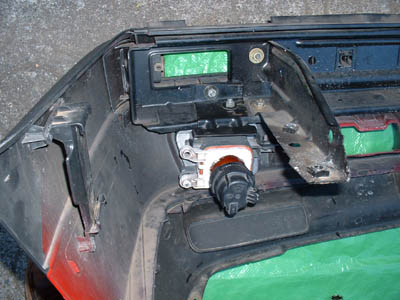
At first, regarding the stock fog lights of Volkswagen Golf Mk2 (A2 Golf), the housings are made from plastic. And it is plated with something. However, that plating comes off by aged deterioration. After that, that part melts by heat and burns out at worst case.
When the plating comes off, the brightness becomes dark. But it is dangerous if you install the high wattage bulbs. But some aftermarket fog lights (OEM) cope with that problem using metal housings. The high wattage bulbs can be installed at that case without that problem.
This content explain the installation of Volkswagen Golf Mk2 Fogs using Mk3 metal projector housings.
The projector housings of Golf Mk3 was made from plastic at first. But after that, the quality of the material changed and uses metal housings. So regarding this modification, we use this metal housings.
How do we distinguish the metal housing from the plastic housings ? That's very easy because the colors of the housing are different. Black/gray is made from plastic. And brown color is made from metal.
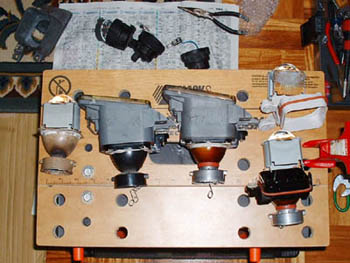
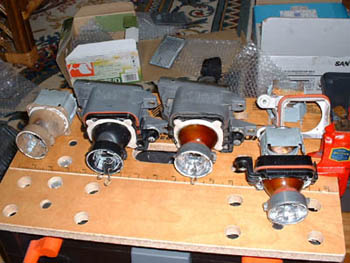
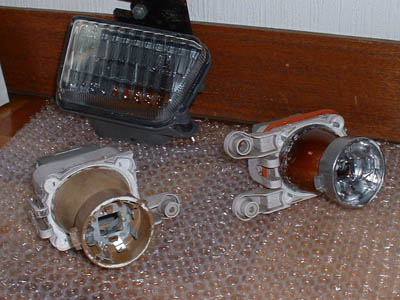
These are fog lights which explained in the above-mentioned.
From left side....
- Stock fog light of Volkswagen Golf Mk2 (You can see the singe.)
- Stock fog light of Volkswagen Golf Mk3 using plastic projector housing. (The housing melts, as you can see.)
- Stock fog light of Volkswagen Golf Mk3 using metal projector housing. (We use this housing.)
- Dismantled Golf Mk3 fog light (Metal version)
Regarding the projector housings, the size of mk2 is similar to mk3. So we install Mk3 metal housings into Mk2 fog lenses. But bolts for the optical axis adjustment are different. Therefore we have to use Mk2 brackets including bolts' holes.
The explanation of the installation.
- Needed parts and tools -
- Stock fog lights of Golf Mk3 using metal projector housings (1 set. Used is OK.)
- Silicon Sealant for waterpoof (Heatproof : 150 - 200 degrees C.)
- Universal tools and a cutter
[ Remove the fog lights ]
Remove the big bumpers. After that, remove the fogs.
Please see this page. It's indicated how to remove the big bumpers.
[ Dismantle Mk2 fog lights ]
Remove the lenses from the projector housings.
The housing is fixed with 2 plastic stays. Loosen bolts for the optical axis adjustment slowly. Lift those stays using minus screwdriver and pull bolts out carefully. If you cannot do that easily, you had better use the air heat gun (or hair dryer).
Remove the brackets from the projector.
The bracket and housing are fixed with white caulking. So strip that caulking off completely using cutter. The metal pins appear at the four corners of the frame after removing the caulking. And pick 4 pins up vertically. After that you can remove the bracket from the projector housing.
[ Dismantle Mk3 fog lights ]
It is the same as the above methods.
These Mk2 and Mk3 fogs divide into following four parts.
- Lense
- Projector (Spherical lense with the metal bracket )
- Bracket (Plastic with the bolts's holes for the optical axis adjustment )
- Housing (Reflector and the cap for bulb )
The following picture is before dismantlement of Mk3 fog.
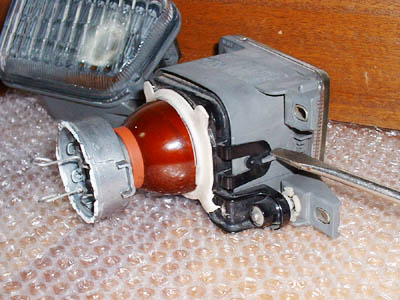
Removed the caulking completely. You can see the two of four pins.
[ Assemble ]
Use the following parts.
1) Mk2 Lenses
2) Mk3 Projector (Spherical lense with the metal bracket )
3) Mk3 Housing (Reflector and the cap for bulb )
4) Mk2 Bracket (Plastic with the bolts's holes for the optical axis adjustment )
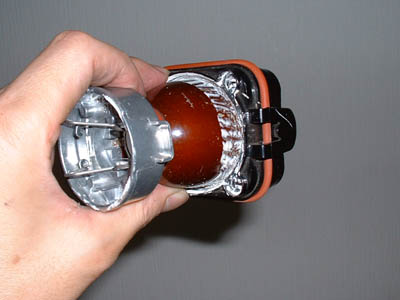
Put 3) into 2) and install into 4). Fix the four pins at the four corners of the frame. Confirm if those parts are fixed completely.
[ Caulking ]
Caulk the housing and bracket using Silicon Sealant. Dry it about one day and install 1) (Mk2 Lense) into that part. At that time, screw up the bolts or the optical axis adjustment slowly. And put orange rubber on.
Finish!